API Blueprint tutorial
Just as Swagger defines a spec for describing a REST API, API Blueprint is another specification for describing REST APIs. If you describe your API with this blueprint, tools that support API Blueprint can read and display the information.
Note that unless you’re using a platform that specifically requires API Blueprint, I recommend using the OpenAPI specification instead.
- What is API Blueprint
- Sample blueprint
- Parsing the blueprint
- Create a sample HTML output using API Blueprint and Apiary
What is API Blueprint
The API Blueprint spec is written in a Markdown-flavored syntax. It’s not regular Markdown, but it has a lot of the same, familiar Markdown syntax. However, the blueprint is a particular schema that is either valid or not valid based on the element names, order, spacing, and other details. In this way, it’s not nearly as flexible or forgiving as Markdown. But it may be preferable to YAML.
Sample blueprint
Here’s a sample blueprint to give you an idea of the syntax:
FORMAT: 1A
HOST: http://polls.apiblueprint.org/

# test

Polls is a simple API allowing consumers to view polls and vote in them.

# Polls API Root [/]

This resource does not have any attributes. Instead, it offers the initial
API affordances in the form of the links in the JSON body.

It is recommended to follow the “url" link values,
[Link](https://tools.ietf.org/html/rfc5988), or Location headers where
applicable to retrieve resources. Instead of constructing your own URLs,
to keep your client decoupled from implementation details.

## Retrieve the Entry Point [GET]

+ Response 200 (application/json)

        {
            "questions_url": "/questions"
        }

## Group Question

Resources related to questions in the API.

## Question [/questions/{question_id}]

A Question object has the following attributes:

+ question
+ published_at - An ISO8601 date when the question was published.
+ url
+ choices - An array of Choice objects.

+ Parameters
    + question_id: 1 (required, number) - ID of the Question in form of an integer

### View a Questions Detail [GET]

+ Response 200 (application/json)

        {
            "question": "Favourite programming language?",
            "published_at": "2014-11-11T08:40:51.620Z",
            "url": "/questions/1",
            "choices": [
                {
                    "choice": "Swift",
                    "url": "/questions/1/choices/1",
                    "votes": 2048
                }, {
                    "choice": "Python",
                    "url": "/questions/1/choices/2",
                    "votes": 1024
                }, {
                    "choice": "Objective-C",
                    "url": "/questions/1/choices/3",
                    "votes": 512
                }, {
                    "choice": "Ruby",
                    "url": "/questions/1/choices/4",
                    "votes": 256
                }
            ]
        }

## Choice [/questions/{question_id}/choices/{choice_id}]

+ Parameters
    + question_id: 1 (required, number) - ID of the Question in form of an integer
    + choice_id: 1 (required, number) - ID of the Choice in form of an integer

### Vote on a Choice [POST]

This action allows you to vote on a question's choice.

+ Response 201

    + Headers

            Location: /questions/1

## Questions Collection [/questions{?page}]

+ Parameters
    + page: 1 (optional, number) - The page of questions to return

### List All Questions [GET]

+ Response 200 (application/json)

    + Headers

            Link: </questions?page=2>; rel="next"

    + Body

            [
                {
                    "question": "Favourite programming language?",
                    "published_at": "2014-11-11T08:40:51.620Z",
                    "url": "/questions/1",
                    "choices": [
                        {
                            "choice": "Swift",
                            "url": "/questions/1/choices/1",
                            "votes": 2048
                        }, {
                            "choice": "Python",
                            "url": "/questions/1/choices/2",
                            "votes": 1024
                        }, {
                            "choice": "Objective-C",
                            "url": "/questions/1/choices/3",
                            "votes": 512
                        }, {
                            "choice": "Ruby",
                            "url": "/questions/1/choices/4",
                            "votes": 256
                        }
                    ]
                }
            ]

### Create a New Question [POST]

You may create your own question using this action. It takes a JSON
object containing a question and a collection of answers in the
form of choices.

+ question (string) - The question
+ choices (array[string]) - A collection of choices.

+ Request (application/json)

        {
            "question": "Favourite programming language?",
            "choices": [
                "Swift",
                "Python",
                "Objective-C",
                "Ruby"
            ]
        }

+ Response 201 (application/json)

    + Headers

            Location: /questions/2

    + Body

            {
                "question": "Favourite programming language?",
                "published_at": "2014-11-11T08:40:51.620Z",
                "url": "/questions/2",
                "choices": [
                    {
                        "choice": "Swift",
                        "url": "/questions/2/choices/1",
                        "votes": 0
                    }, {
                        "choice": "Python",
                        "url": "/questions/2/choices/2",
                        "votes": 0
                    }, {
                        "choice": "Objective-C",
                        "url": "/questions/2/choices/3",
                        "votes": 0
                    }, {
                        "choice": "Ruby",
                        "url": "/questions/2/choices/4",
                        "votes": 0
                    }
                ]
            }
For a tutorial on the blueprint syntax, see these resources:
You can find examples of different blueprints here. The examples can often clarify different aspects of the spec.
Parsing the blueprint
Many tools can parse an API blueprint. Drafter is one of the main parsers of the Blueprint. Many other tools build on Drafter and generate static HTML outputs of the blueprint. For example, Aglio can parse a blueprint and generate static HTML files.
For a more comprehensive list of tools, see the Tooling section on apiblueprint.org. (Some of these tools require quite a few prerequisites, so I omitted the tutorial steps here for generating the output on your own machine.)
Create a sample HTML output using API Blueprint and Apiary
For this tutorial, we’ll use a platform called Apiary to read and display the API Blueprint. Apiary is just a hosted platform that will remove the need for installing local libraries and utilities to generate the output.
a. Create a new Apiary project
- Go to apiary.io and click Quick start with Github. Sign in with your Github account. (If you don’t have a Github account, create one first.)
-
Sign up for a free hacker account and create a new project.
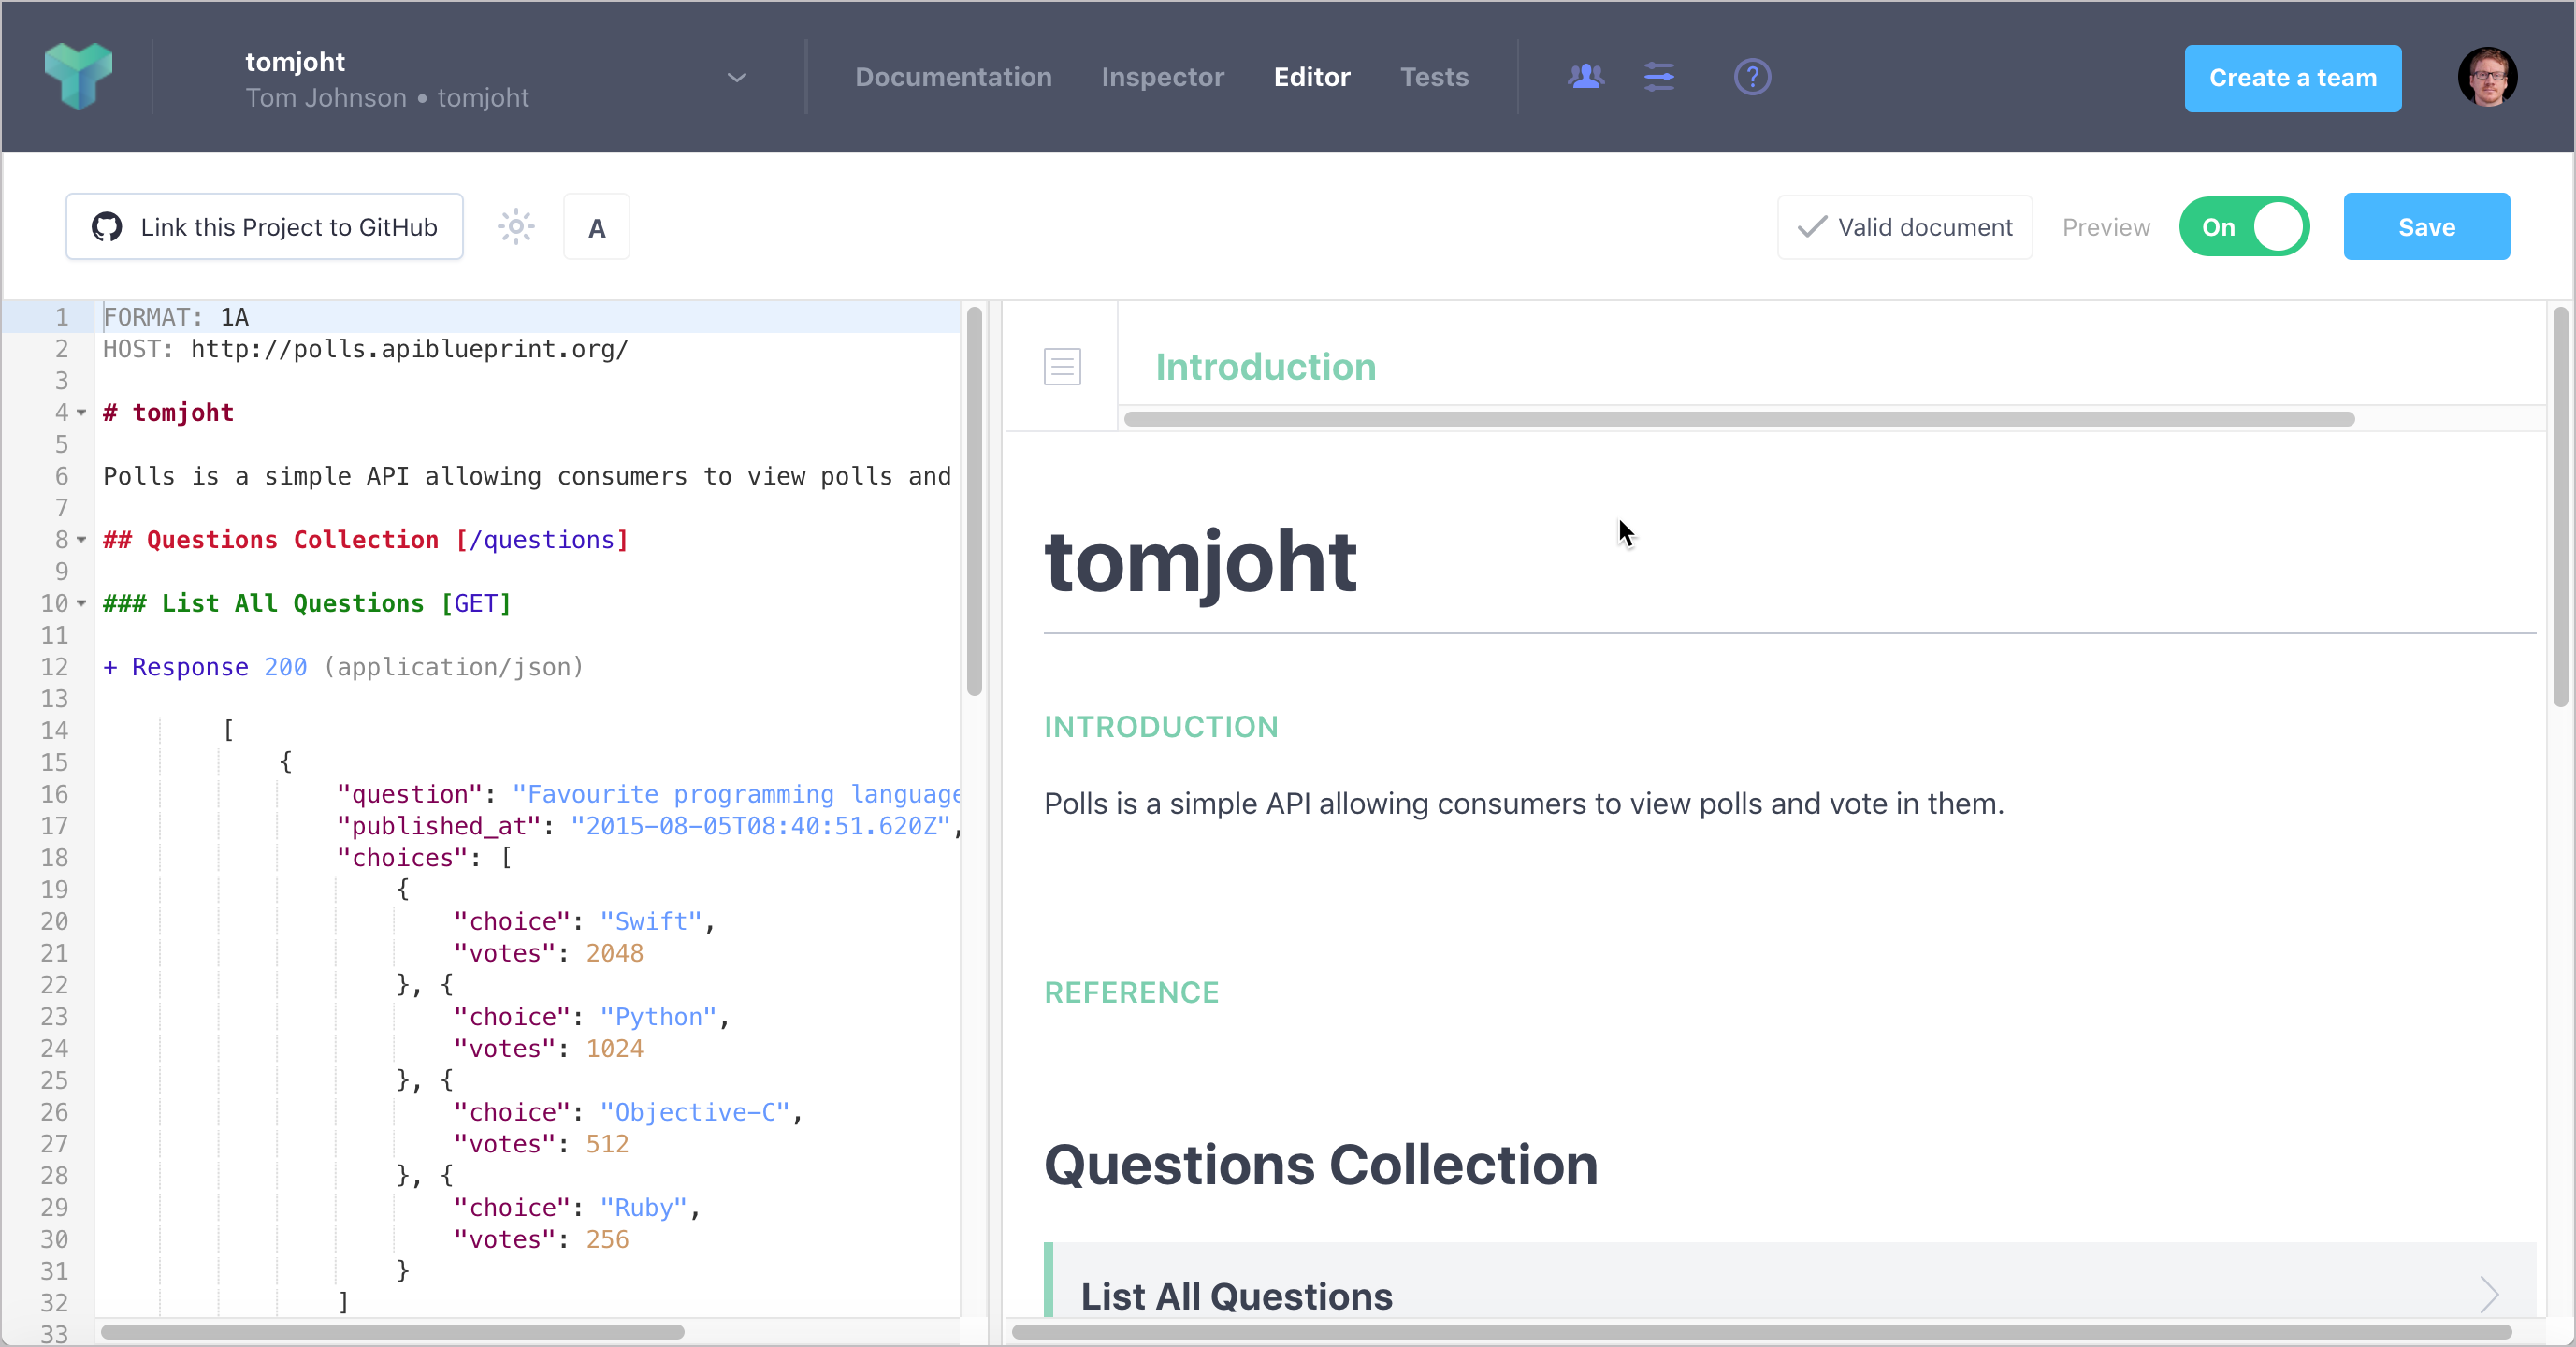
You’ll be placed in the API Blueprint editor.

API Blueprint editor on Apiary By default, the Polls blueprint is loaded so you can see how it looks. This blueprint gives you an example of the required format for the Apiary tool to parse and display the content. You can also see the raw file here.
-
At this point, you would start describing your API using the blueprint syntax in the editor. When you make a mistake, error flags indicate what’s wrong.
You can read the Apiary tutorial and structure your documentation in the blueprint format. The syntax seems to accommodate different methods applied to the same resources.
For this tutorial, you’ll integrate the OpenWeatherMap weather API information info formatted in the blueprint format.
-
Copy the following code, which aligns with the API Blueprint spec, and paste it into the Apiary Blueprint editor.
FORMAT: 1A HOST: https://api.openweathermap.org/data/2.5/ # OpenWeatherMap API Get the current weather, daily forecast for 16 days, and a three-hour-interval forecast for 5 days for your city. Helpful stats, graphics, and this day in history charts are available for your reference. Interactive maps show precipitation, clouds, pressure, wind around your location stations. Data is available in JSON, XML, or HTML format. **Note**: This sample Swagger file covers the `current` endpoint only from the OpenWeatherMap API. <br/><br/> **Note**: All parameters are optional, but you must select at least one parameter. Calling the API by city ID (using the `id` parameter) will provide the most precise location results. ## Authentication This API uses Custom Query Parameter for its authentication. The parameters that are needed to be sent for this type of authentication are as follows: + `appid` - API key to authorize requests. # Group Current Weather Data ## Weather [/weather{?q,id,lat,lon,zip,units,lang,Mode}] ### Call current weather data for one location [GET] Access current weather data for any location on Earth including over 200,000 cities! Current weather is frequently updated based on global models and data from more than 40,000 weather stations. + Parameters + q (string, optional) **City name**. *Example: London*. You can call by city name, or by city name and country code. The API responds with a list of results that match a searching word. For the query value, type the city name and optionally the country code divided by a comma; use ISO 3166 country codes. + id (string, optional) **City ID**. *Example: `2172797`*. You can call by city ID. The API responds with the exact result. The List of city IDs can be downloaded [here](http://bulk.openweathermap.org/sample/). You can include multiple cities in this parameter — just separate them by commas. The limit of locations is 20. *Note: A single ID counts as a one API call. So, if you have 3 city IDs, it’s treated as 3 API calls.* + lat (string, optional) **Latitude**. *Example: 35*. The latitude coordinate of the location of your interest. Must use with `lon`. + lon (string, optional) **Longitude**. *Example: 139*. Longitude coordinate of the location of your interest. Must use with `lat`. + zip (string, optional) - **Zip code**. Search by zip code. *Example: 95050,us*. Please note that if the country is not specified, the search uses USA as a default. + Default: 94040,us + Sample: 94040,us + units (enum[string], optional) **Units**. *Example: imperial*. Possible values: `metric`, `imperial`. When you do not use the `units` parameter, the format is `standard` by default. + Default: standard + Sample: imperial + Members + `standard` + `metric` + `imperial` + lang (enum[string], optional) **Language**. *Example: en*. You can use lang parameter to get the output in your language. We support the following languages that you can use with the corresponded lang values: Arabic - `ar`, Bulgarian - `bg`, Catalan - `ca`, Czech - `cz`, German - `de`, Greek - `el`, English - `en`, Persian (Farsi) - `fa`, Finnish - `fi`, French - `fr`, Galician - `gl`, Croatian - `hr`, Hungarian - `hu`, Italian - `it`, Japanese - `ja`, Korean - `kr`, Latvian - `la`, Lithuanian - `lt`, Macedonian - `mk`, Dutch - `nl`, Polish - `pl`, Portuguese - `pt`, Romanian - `ro`, Russian - `ru`, Swedish - `se`, Slovak - `sk`, Slovenian - `sl`, Spanish - `es`, Turkish - `tr`, Ukrainian - `ua`, Vietnamese - `vi`, Chinese Simplified - `zh_cn`, Chinese Traditional - `zh_tw`. + Default: en + Sample: en + Members + `ar` + `bg` + `ca` + `cz` + `de` + `el` + `en` + `fa` + `fi` + `fr` + `gl` + `hr` + `hu` + `it` + `ja` + `kr` + `la` + `lt` + `mk` + `nl` + `pl` + `pt` + `ro` + `ru` + `se` + `sk` + `sl` + `es` + `tr` + `ua` + `vi` + `zh_cn` + `zh_tw` + Mode (enum[string], optional) **Mode**. *Example: html*. Determines the format of the response. Possible values are `xml` and `html`. If the mode parameter is empty, the format is `json` by default. + Default: json + Sample: json + Members + `json` + `xml` + `html` + Response 200 (application/json) Successful response + Attributes (Successful response) + Response 404 Not found response # Data Structures ## Successful response (object) ### Properties + `coord` (Coord, optional) + `weather` (array[Weather], optional) - (more info Weather condition codes) + `base`: `cmc stations` (string, optional) - Internal parameter + `main`: `cmc stations` (Main, optional) + `visibility`: `16093` (number, optional) - Visibility, meter + `wind`: `16093` (Wind, optional) + `clouds`: `16093` (Clouds, optional) + `rain`: `16093` (Rain, optional) + `snow`: `16093` (Snow, optional) + `dt`: `1435658272` (number, optional) - Time of data calculation, unix, UTC + `sys`: `1435658272` (Sys, optional) + `id`: `2172797` (number, optional) - City ID + `name`: `Cairns` (string, optional) + `cod`: `200` (number, optional) - Internal parameter ## Coord (object) ### Properties + `lon`: `145.77` (number, optional) - City geo location, longitude + `lat`: `-16.92` (number, optional) - City geo location, latitude ## Weather (object) ### Properties + `id`: `803` (number, optional) - Weather condition id + `main`: `Clouds` (string, optional) - Group of weather parameters (Rain, Snow, Extreme etc.) + `description`: `broken clouds` (string, optional) - Weather condition within the group + `icon`: `04n` (string, optional) - Weather icon id ## Main (object) ### Properties + `temp`: `293.25` (number, optional) - Temperature. Unit Default: Kelvin, Metric: Celsius, Imperial: Fahrenheit. + `pressure`: `1019` (number, optional) - Atmospheric pressure (on the sea level, if there is no sea_level or grnd_level data), hPa + `humidity`: `83` (number, optional) - Humidity, % + `temp_min`: `289.82` (number, optional) - Minimum temperature at the moment. This is a deviation from current temp that is possible for large cities and megalopolises geographically expanded (use this parameter optionally). Unit Default: Kelvin, Metric: Celsius, Imperial: Fahrenheit. + `temp_max`: `295.37` (number, optional) - Maximum temperature at the moment. This is a deviation from current temp that is possible for large cities and megalopolises geographically expanded (use this parameter optionally). Unit Default: Kelvin, Metric: Celsius, Imperial: Fahrenheit. + `sea_level`: `984` (number, optional) - Atmospheric pressure on the sea level, hPa + `grnd_level`: `990` (number, optional) - Atmospheric pressure on the ground level, hPa ## Wind (object) ### Properties + `speed`: `5.1` (number, optional) - Wind speed. Unit Default: meter/sec, Metric: meter/sec, Imperial: miles/hour. + `deg`: `150` (number, optional) - Wind direction, degrees (meteorological) ## Clouds (object) ### Properties + `all`: `75` (number, optional) - Cloudiness, % ## Rain (object) ### Properties + `3h`: `3` (number, optional) - Rain volume for the last 3 hours ## Snow (object) ### Properties + `3h`: `6` (number, optional) - Snow volume for the last 3 hours ## Sys (object) ### Properties + `type`: `1` (number, optional) - Internal parameter + `id`: `8166` (number, optional) - Internal parameter + `message`: `0.0166` (number, optional) - Internal parameter + `country`: `AU` (string, optional) - Country code (GB, JP etc.) + `sunrise`: `1435610796` (number, optional) - Sunrise time, unix, UTC + `sunset`: `1435650870` (number, optional) - Sunset time, unix, UTCIf the code isn’t easy to copy and paste, you can view and download the file here.
- Click Save.
Similar to Swagger Editor, the Apiary editor shows you the output in the right pane.
b. Interact with the API on Apiary
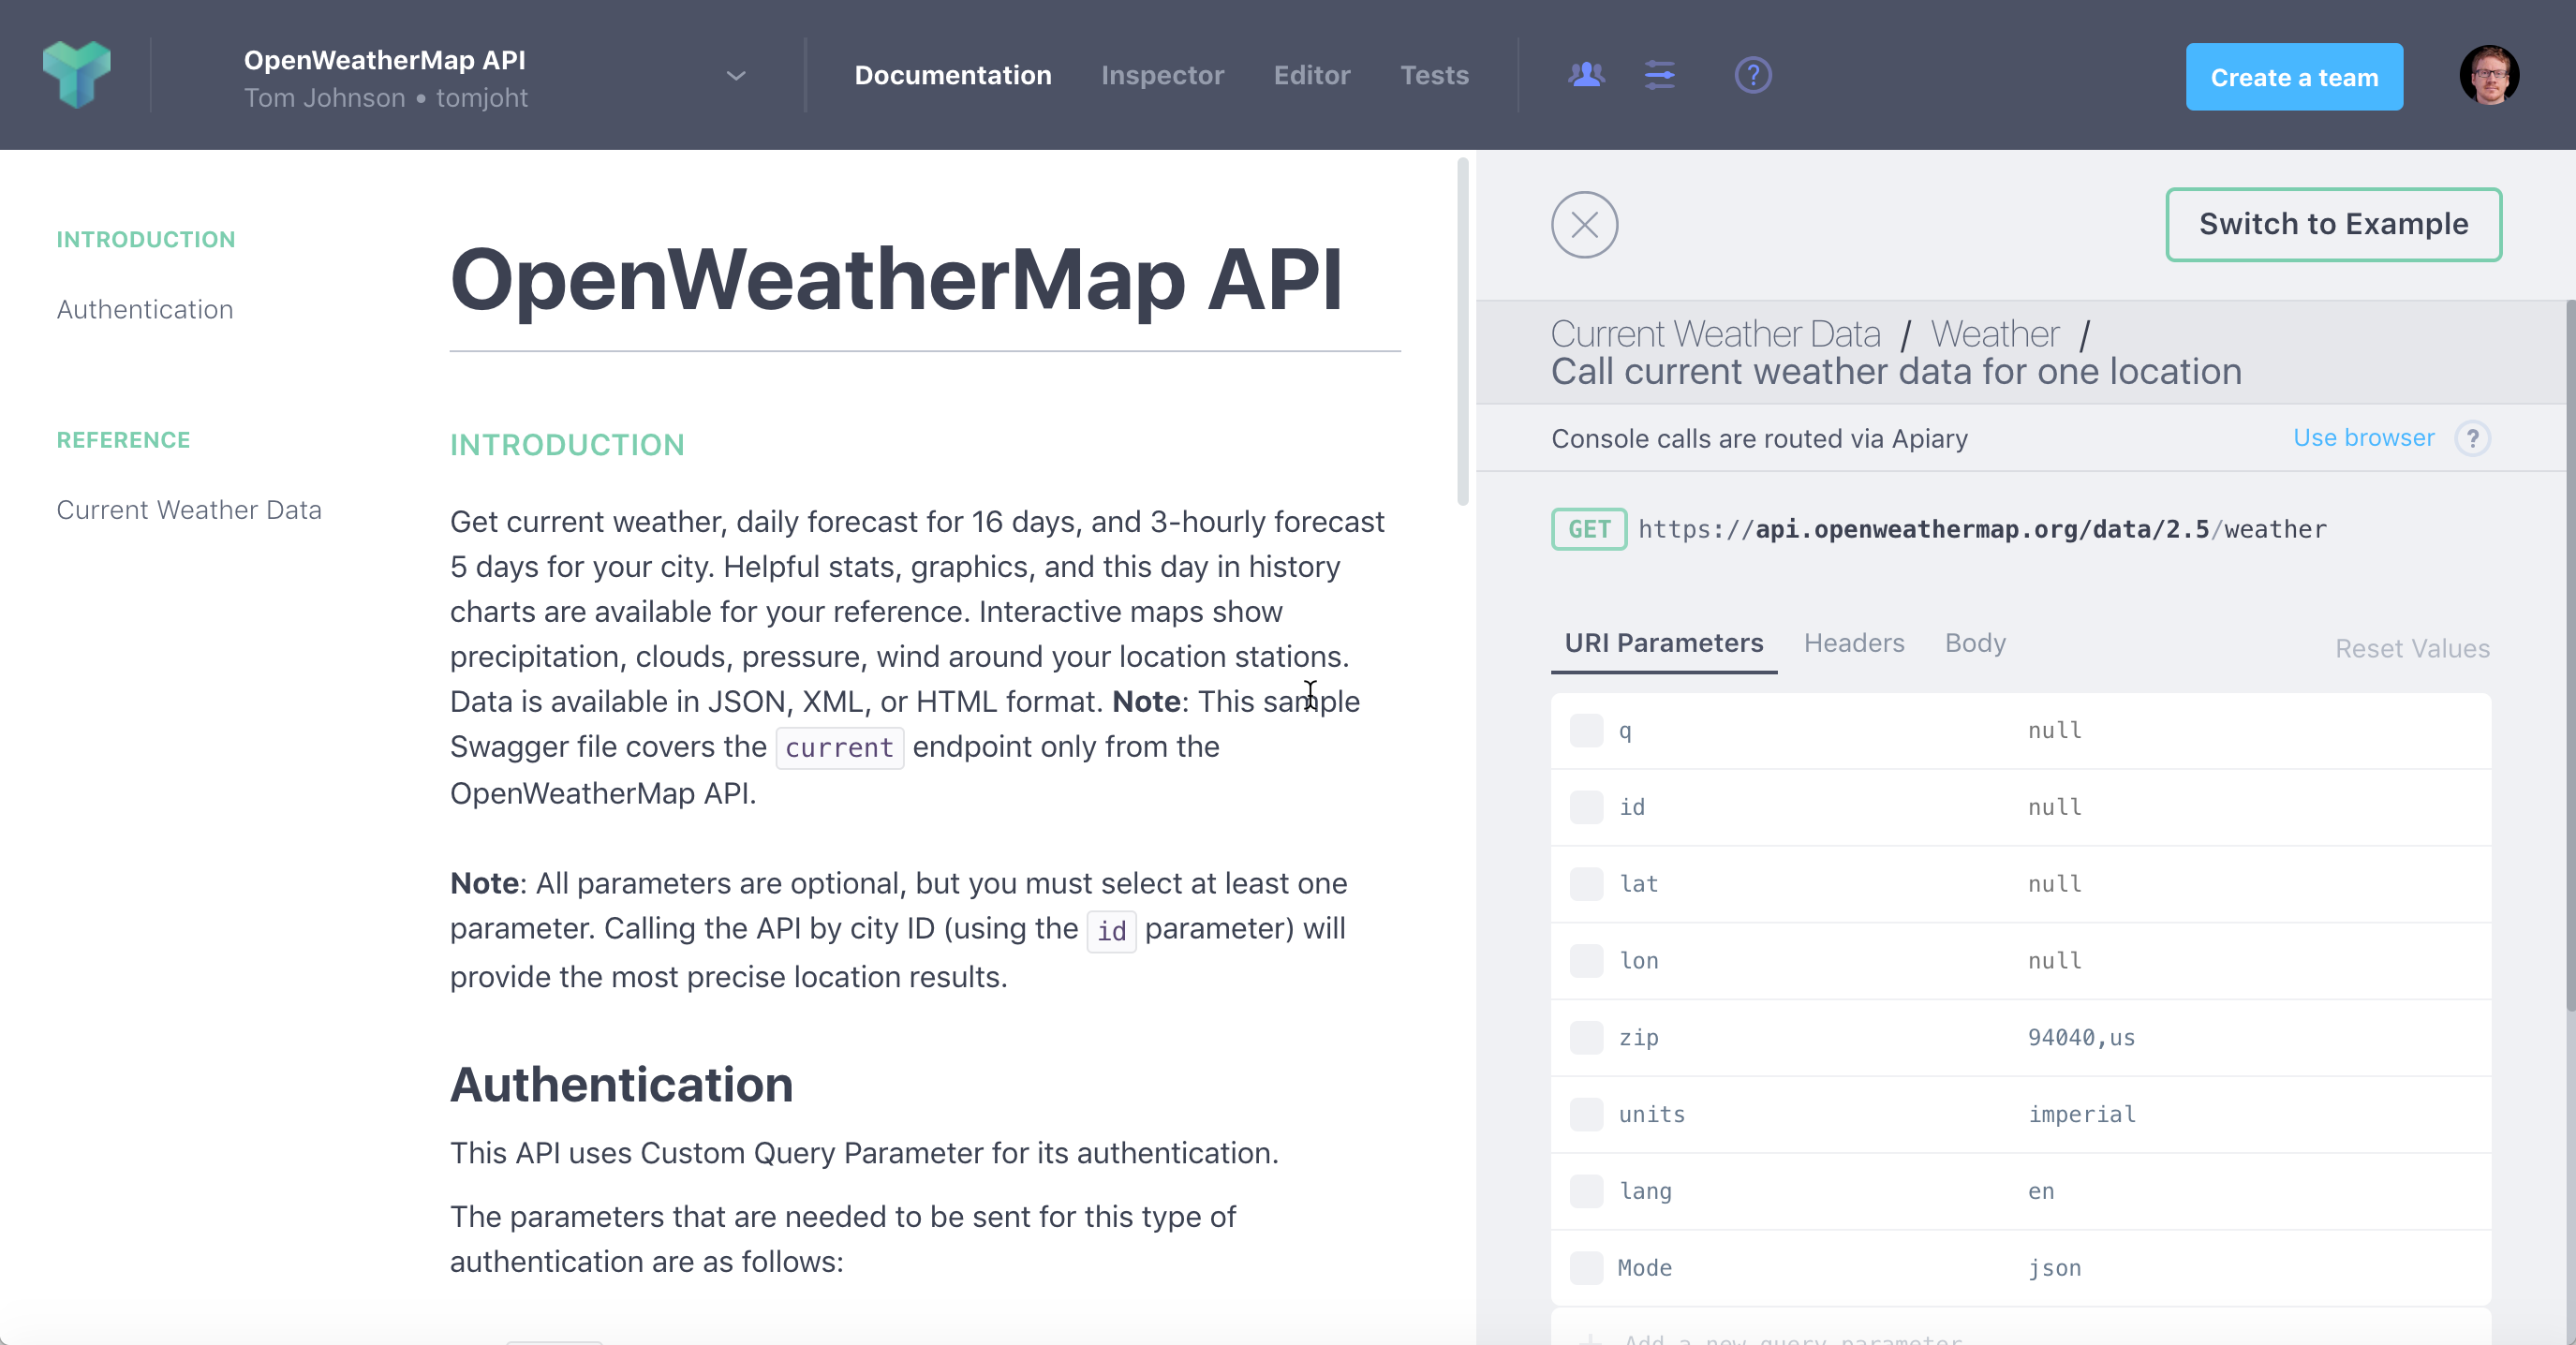
In the Apiary’s top navigation, click Documentation. Then interact with the API on Apiary by clicking first selecting an endpoint and then clicking Switch to Console. Call the resources and view the responses.

You can switch between an Example and a Console view in the documentation. The Example view shows pre-built responses. The Console view allows you to enter your own values and generate dynamic responses based on your own API key. This dual display — both the Example and the Console views — might align better with user needs:
- For users who might not have good data or might not want to make requests that would affect their data, they can view the Example.
- For users who want to see how the API specifically returns either their data or specific parameters, they can use the Console view.
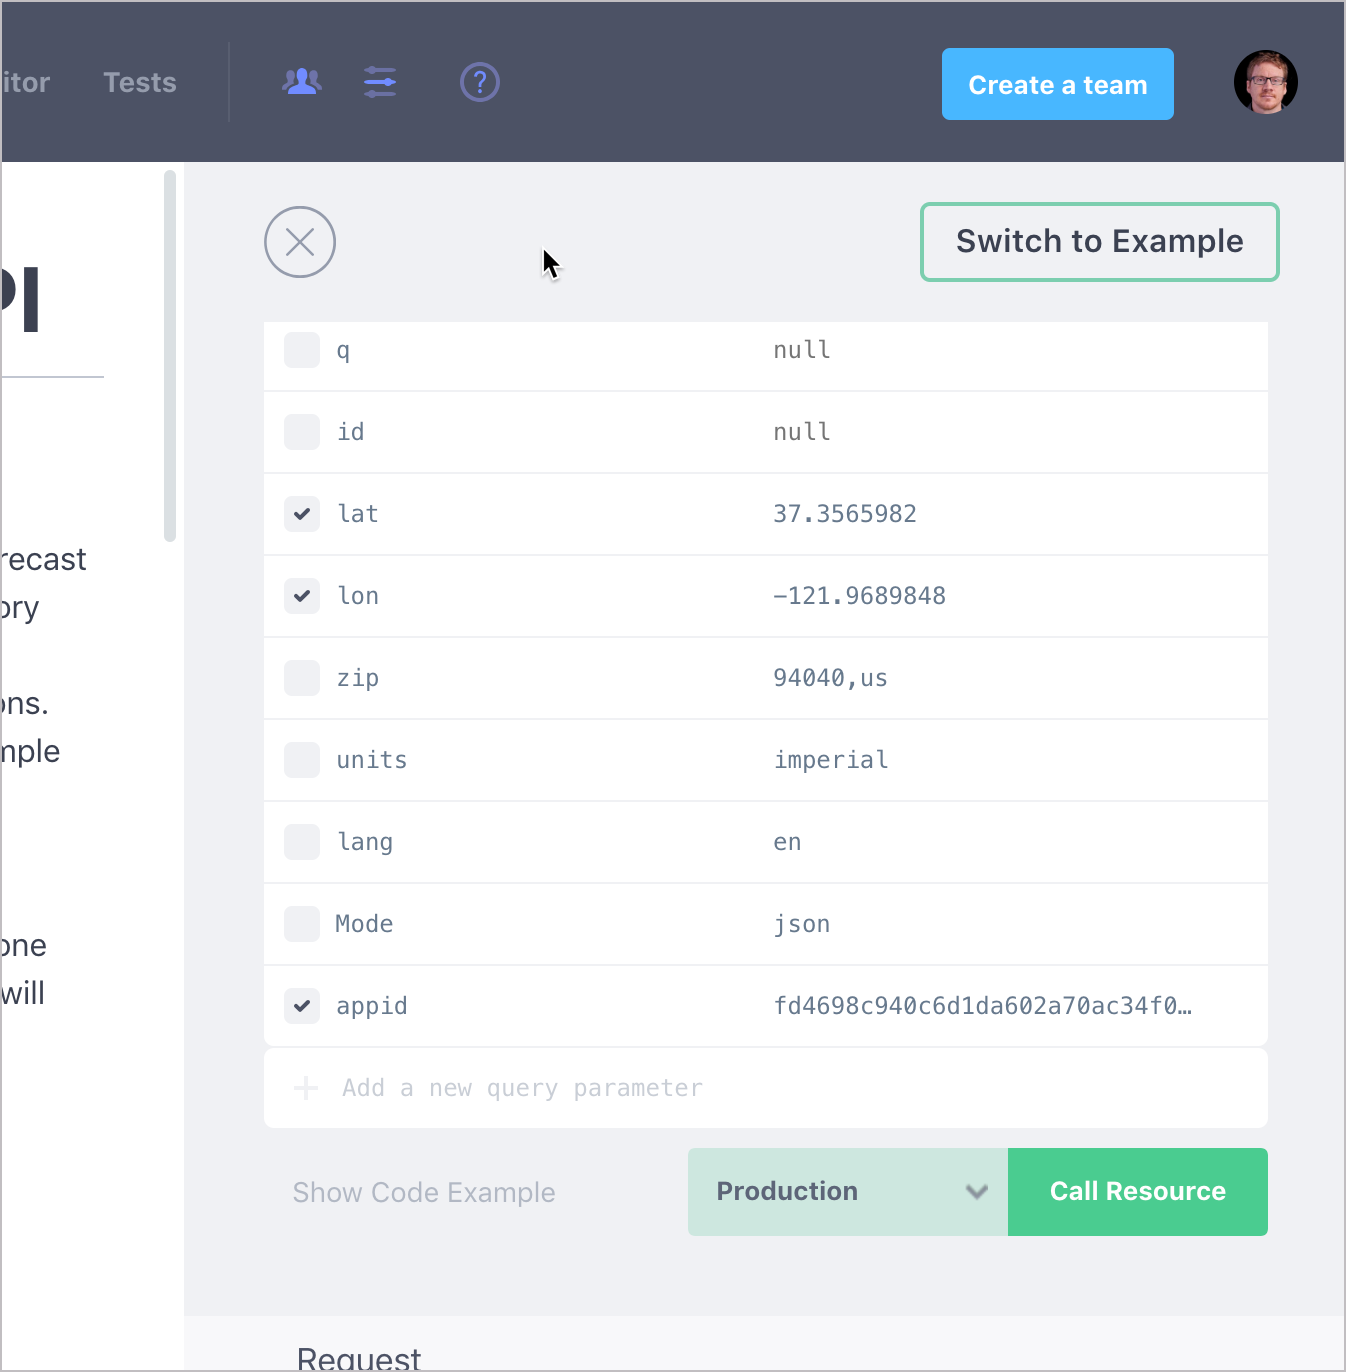
To call the resource successfully, you’ll need to customize the lat and lon values (e.g., 37.3565982 and -121.9689848) and also add an appid parameter whose value is your API key. You can then call the resource successfully.

Apiary offers an impressive platform for both designing and publishing API reference docs. You don’t have to use API Blueprint as your spec’s format. You can also design your specification using OpenAPI (called “Swagger” in the Apiary UI).
About Tom Johnson

I'm an API technical writer based in the Seattle area. On this blog, I write about topics related to technical writing and communication — such as software documentation, API documentation, AI, information architecture, content strategy, writing processes, plain language, tech comm careers, and more. Check out my API documentation course if you're looking for more info about documenting APIs. Or see my posts on AI and AI course section for more on the latest in AI and tech comm.
If you're a technical writer and want to keep on top of the latest trends in the tech comm, be sure to subscribe to email updates below. You can also learn more about me or contact me. Finally, note that the opinions I express on my blog are my own points of view, not that of my employer.
163/167 pages complete. Only 4 more pages to go.
